Showing posts with label recipe. Show all posts

Saturday, January 29, 2011

Chocolate Bundt Cake

really just a glorified cake mix.

This is a really moist cake.
I've never baked it in a regular 9x13, but I'm sure you could.  I guess in the bundt pan it seems more fancy...especially when it's really just a cake mix with extras!

Bundt Chocolate Cake

1 pkg devil's food cake mix (or any chocolate, I think I used chocolate fudge cake for this)
1 (5.9 oz) pkg instant chocolate pudding
1 c. sour cream
1 c. oil
4 eggs
1/2 c. warm water
1 tsp vanilla
optional: add 2 c. semi-sweet chocolate chips

Preheat oven to 350.
In large bowl, mix together everything. Stir in chocolate chips at the end if you are using them. Pour batter into well greased 12 cup bundt pan.


Bake for 50-55 minutes, or until toothpick in center comes out clean. Let cake cool at least 1 hour before inverting pan to dump cake out.

For the frosting, I used Katherine's Dark Chocolate Ganache Recipe, but only used 1/4 recipe for this cake.  I'm not a frosting lover, so I spread it on pretty thin.


Tuesday, December 21, 2010

Bread Bowls

We like bread bowls for creamy soups in the winter.  You cut the top off, gut out the bread for dipping, and enjoy!

Bread Bowls
2 1/2 c. warm water
2 T yeast
2 T sugar
stir or plop in mixer and let froth until doubles

Add:
1 T salt
1 T shortening (I don't measure, just guess with a cereal spoon)
7 c. flour  ***Add about 5 cups, then add 1/2 c. at a time until 7 cups, or until dough cleans side of bowl

Knead until smooth and satiny, not as sticky as your roll dough would be.

Put in greased bowl and cover. Let rise until doubled, punch down. Shape into cylinder globs,  4 globs to a greased cookie sheet, and let rise until double or so.  *Can brush with beaten egg whites just before baking.
Makes 8 large bakery bread bowls.
Bake at 375 for 20 min.

Here are my dough cylinders.  I split one bowl into 2 baby bowls.

Here they are raised right before I baked them.
When it was just me and Rhett, I would halve this recipe and make 4 big bread bowls. This full recipe makes 8 bakery-sized bread bowls.  Or tonight I made 3 large bread bowls, 2 baby bowls, then the other half of the dough I made a big loaf of french bread.
You can also freeze the bread bowls for future meals.

Wednesday, August 18, 2010

Honey Lime Enchiladas and Spanish Rice

I haven't posted many recipes lately, the beginning of the summer I was in a cooking funk, but the last couple weeks I've liked cooking again, and making new recipes.
This first recipe I've made in the past, and it was OK.  I originally got it from the sister's cafe blog..

But here's the changes I made.

Honey Lime Pork Enchiladas
This picture looks like bonch.  I probably should have waited to put the sour cream and guacamole on.  It tasted good, much better than this looks.
Marinade:
1/3 c. honey
1/4 c. lime juice (I just used the concentrate from the juice section)
1 heaping T. chili powder
1/2 tsp garlic powder
1/2 tsp beef bullion
1/2 c. hot water (to dissolve honey)
Stir all of this in your 4 qt crock pot.  Add 1 1/2 lb pork roast. (I actually used pork tenderloin and it worked too)
Cook on low all day, at least 4-5 hours.

Other Ingredients:
marinated meat from above
2 c. mozzarella cheese, shredded
2 c. cheddar cheese, shredded
1/4 to 1/2 c. green onions
tortillas

2 (10 oz) cans green enchilada sauce
whipping cream 1/2 c. to 1 c.

Assemble Enchiladas:
Spray a 9x13 and 9x9 (I froze the 9x9 for another day)
Spread enchilada sauce on bottom of pans
Fill tortillas with a little hand full of the mixed cheeses, green onions, and meat.  Roll up and fill pans.
Pour the rest of the enchilada sauce on top of the rolled tortillas.
Sprinkle cheese all over.
Drizzle cream on top of the cheese.

Bake at 350 for 30 minutes.

Spanish/ Mexican Rice
from high school friend Megan Wadsworth Mecham
she brought this to a high school girls choice dance--dinner was a potluck fiesta at my house and I remembered how much I liked her rice (lots of flavor) and found her on facebook a while ago to snag the recipe

1 c. raw rice
1/4 c. green pepper, diced small
1/2 to 1 med. onion, diced small
Saute in a little butter in nonstick skillet until browned.
Add:
2 tsp parsley
1 1/2 tsp salt
1/4 tsp garlic powder
1/8 tsp pepper
1/8 tsp. tumeric
1 c. water
1 can diced tomatoes

Bring to a boil, Simmer 25 minutes. I sprinkle a little cheese on to melt into it when it's ready.
**I also didn't have tumeric and just left it out

Thursday, April 15, 2010

Blackberry Lemon Streusel Muffin

I made just the plain lemon and the blackberry lemon
I found the recipe on Katherine's blog here.
She found it on The Sister's Cafe here.
Lemon.
Streusel.
Glaze.
BooYah!


These are the changes I made, basically just adding blackberries into the muffins before you bake them:
Rinse and drain a large handful of blackberries.  Cut them in half.  Sprinkle with sugar.

When you are making the muffins, put a big spoonful in each muffin.  Spoon 4-5 blackberry chunks on top of the batter.  Got back through and finish off the batter with another spoonful on top of the berries.  That way they are in the muffin, but the whole batter isn't pink if you just dumped them in and stirred it up, which you could do too.

I used the bowl that had the blackberries in it to make the lemon glaze, so that was pink.

This is a really good muffin recipe.  LOTS of flavor and great dense, moist texture.

Thursday, February 25, 2010

Ginger Lemon Cream Pie

I had made gingerbread cookies last week, and today there were 5 or 6 cookies left, but they were too hard to eat.  Beyond even being ginger snaps.  But I couldn't throw them away and thought they'd make a yummy crust.  I had a cheesecake recipe that used a ginger snap crust.  But then I remembered these cookies I see by the bread at Costco.  Carr's Ginger Lemon cookies.  I always want to buy them but never had, so I thought of lemon and ginger.

But I didn't want the lemon to be tangy like using real lemon juice and having any hint of sour.  I was thinking of sweet lemon flavor and thought of Erin Walker's lemon ice cream recipe.  I wanted to make a pie out of that ice cream flavor.


I think it worked out pretty good.  I felt like I was eating the Walker ice cream in pie form.
Slightly spicy ginger crust with creamy, smooth, lemon filling.
Top it with real whipped cream and it would be divine.
We only had Cool Whip.

Lemon Cream Pie with Ginger Snap Crust

CRUST:
ginger snap cookies
     (6 homemade, probably 10-12 store bought)
      enough to make 1 1/2 c. crumbs
2-3 T butter,  melted

Crush cookies into fine crumbs, or I just threw them in the food processor.
Dump your crumbs in pie tin/ plate.  Drizzle melted butter over crumbs, press in butter with fork, and form to bottom and sides of pan.
Freeze.

PIE FILLING:
1 T milk
1/3 c. cornstarch
3 egg yolks
1/4 tsp salt
3/4 c. sugar
2 1/2 c. milk
1 tsp vanilla
1/4 tsp lemon oil OR 1 tsp lemon extract (I was out of extract, thus resorted to oil, which is mainly for candy I think, but it worked)
1 T butter
 
In medium saucepan combine the 1 T milk, cornstarch, yolks, salt, and sugar.  Whisk until it's a smooth paste.  Add the 2 1/2 c. milk.  Whisk until it's a smooth liquid.  Stirring constantly, cook on medium heat until filling thickens to pudding like consistency.  I test it by scooping a glob with the whisk, and it should somewhat stay in the whisk.  If it runs right out, keep cooking.  Basically until it's like pudding. 
 
Remove from heat. Add the vanilla, lemon and butter.  Whisk a minute or so to help it cool down.  Grab your crust and pour filling over crust.  Smooth it over and cover with plastic wrap, pushing it down right on the pie without air bubbles to prevent "pudding skin". 
That always reminds me of the Seinfeld episode where George tries to invent Pudding Skin Singles.
 
Refrigerate for a few hours to set.
Serve with whipped cream, or if you're lame like me.."whipped topping"
 
**In a hurry: Microwave in glass bowl 1 min at at time, stirring between, as it begins to thicken at all, cut cook intervals to 30 seconds so you don't make it too thick.  

Saturday, February 6, 2010

Sugar Cookie

I am a sugar cookie snob.
Maybe it's because I'm not the biggest fan of frosting.  I hate it when a sugar cookie is basically a flavorless cracker for frosting. 
I want FLAVOR IN THE COOKIE!
I'm also really critical of cookie texture.  I like soft cookies.  Once again, not a cracker.  To me, a sugar cookie should be soft and chewy, if you fold it in half, it should bend then break, not snap. Melt in your mouth rather than crunch.


So if you are nodding in agreement to this point, there's a good chance you may like to try my mom's sugar cookie recipe.  I think people have varied expectations for sugar cookies, so I give you what I like out of a sugar cookie, so you can know if this cookie may be to your liking.  My mom played with different amounts of cream cheese, sour cream, and butter base to get the right balance for these cookies to have both flavor and texture.

Friday, January 22, 2010

Lemon Drop Cookies


In case you never made these when I posted about them 2 years ago, here's another reminder.  I made a batch yesterday and I love them!  Here's the link to Katherine's recipe.  The only changes I make when I bake these--I only use 2 eggs, because I buy eggs from Costco and they are x-large.  Also, lately I haven't been crushing the candy in the food processor, just pounding it in the package with a marble rolling pin.  I would always over crush in the food processor, so I'd have lemon drop dust rather than small hunks.  That is what makes these cookies.  The lemon drop chunks melt when they bake, so when you eat them you have little crunchy goodies sprinkled through the soft lemony cookie.
Is your mouth watering yet? GO make them!  May seem like more work than most cookies, but save time by using a cookie scoop rather than rolling them in balls.

Monday, January 11, 2010

What Kind of Bird is Pork?

Photobucket

A family joke comes from one occasion my sister, I'm not saying which sister, asked our oldest brother: "Now what kind of bird is pork again?" (she was an adult) James said: "what?" and doodled a pig with wings and said--"this is the pork bird." Kind of funny.

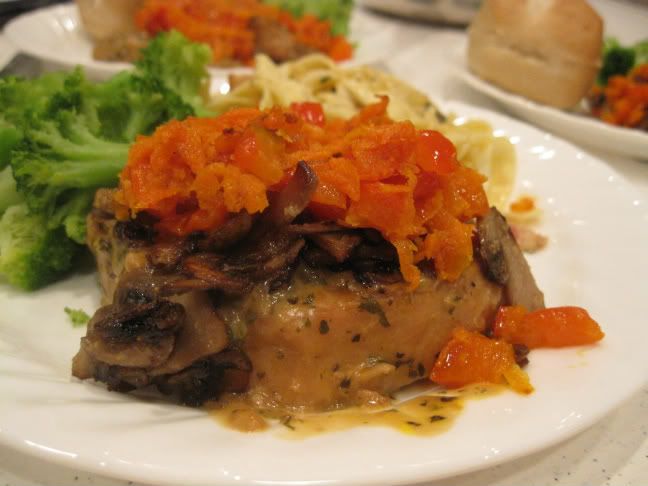
So this is a dish I've been making quite often lately. Pork tenerloin is a less expensive cut of meat, so I've been trying different recipes. Plus I love pork. Lately I buy a big loin from Costco, and it ends up making this dinner three times. I obviously freeze the other two hunks for later. I think I've mentioned on here that as we live with my parents, and they both work full time, I make dinner for all of us. After each meal my dad gives it a rating between 1 & 10. He loves this dish and I think it's the only meal that is my original recipe that's ever recieved a 10 vote. He calls it "Country Club Pork". So I guess that is what it is:


COUNTRY CLUB PORK

ingredients:

1 1/2 to 2 lb pork tenderloin, cut in 1/2 - 1" medallions

1/2 lb mushrooms, sliced

1 red pepper, diced

1 carrot, peeled and grated

2 T butter

2 T olive oil

2 T flour

1 T parsley

1 T basil

1 1/2 tsp beef boulion granules

1/4 tsp salt

1/4 tsp pepper

1/2 to 2/3 c. sherry cooking wine

3/4 c. cream, half-n-half, or milk

1/2 to 1 tsp garlic granules

directions:

This dish takes more time than most of my usual recipes, so I usually prep everything in the morning to save time in the evening:

-Pork: trim off fat from pork tenderloin, cut along between 1/2" and 1", making round medallions

-Veggies: peel & grate carrot, dice red pepper, and plop in large non-stick skillet that has a lid. Drizzle the 2 T olive oil and add one of the 2 tablespoons butter

-Mushrooms: rinse off mushrooms, slice, place in small skillet with the other 1 T butter, and the garlic--you can add more later to suit your preference **my husband hates mushrooms, so I cook them on the side since quite a few people are anti-fungi

-Measure out the flour, salt, pepper, beef granules, basil, & parsley


TIME FOR DINNER, GET COOKING!
1. Mushrooms. If you like them and are using them, start the mushrooms sauteing on medium heat. They have quite a bit of moisture, so they eventually boil. Once they come to a boil, turn the heat down to med-low and let them simmer down and get soft. I like them where they're just beginning to brown up. But the mushrooms are on the side and I just let them cook the whole time, so we'll get back to them when you eat the whole thing
2. Saute the carrot, red pepper until carrots are tender, take them out and set aside until the very end.
3. Plop your pork medallions in the saute pan, and add a little more oil if the carrot/pepper didn't leave enough in the pan. Cook the pork on medium until cooked through, flipping half way, about 8 minutes or so.
4. Once pork is cooked through, turn up heat to high. Brown both sides, giving it a little bit of crispy goodness. Take out the meat and set aside.
5. Pour your cooking sherry in the empty, hot skillet to pull off all the crisp meat flavor from the pan--that is called "deglazing" right? Who cares what it's called, doesn't matter, just makes the sauce taste good.

6. The cooking sherry will boil quickly, let it boil a minute or so, turning down the heat to medium. Then whisk in your flour/herb/salt/pepper/beef stuff until smooth. At this point add your cream/ half-n-half or milk. **I've tried all three, all taste good, but you already know cream tastes the best.

7. Bring sauce to boil. Turn heat down to low, and add the pork back into the sauce, coating both sides. Cover skillet with lid and let meat simmer in the sauce 30 min to 1 hour. One night no one came home on time and it ended up simmering for 1 1/2 hours. If you keep the lid on, it won't dry out, and the meat just has more time to get tender.

At this point everything is done until you're ready to eat.

To serve, I put the pork down, then mushrooms for those that like them, then the carrot/peppers, topped with a spoonful of sauce. I didn't put the sauce on top for the photo.

I've thought about trying this in a crock pot. One night I didn't have mushrooms and sauted onions in its place. I am a sloppy cook, so I rarely measure, so feel free to just grab a glob of butter rather than measuring 1 T, and drizzle oil until it looks good rather than measure 2 T.

So out of the four adults that have been eating this quite frequently lately, we all like it. Tonight Rhett said: "I do have to admit this is one of the better things you cook." So sorry if you spend the time to make it and it is gross to you. We all like it.

Monday, November 23, 2009

Peppermint Bark

Photobucket
Oh how I love this stuff. When I lived in Kirksville one day my friends all got together to master peppermint bark. There wasn't much to master, but it was really fun. This is a super easy, pretty, holiday treat. Great to give to neighbors or eat all yourself.

Ingredients:
1 pound (16 oz) bittersweet chocolate
¼ tsp peppermint oil
1 pound (16 oz) white chocolate
¾ C (about 10) peppermint candy canes, crushed/ chopped
***I used chocolate chips. Gourmet chocolate would be great. I wouldn't recommend using Almond Bark though...but maybe I'm wrong. To me using Almond Bark instead of real chocolate is like substituting Velveeta when a recipe calls for real cheese.

Directions:
1. Line an 11x17-inch baking sheet with foil and set aside. For thicker bark, use 9x13. Put 5 or so candycanes in sandwich baggie and crush with rolling pin until chunks. **
2. Melt bittersweet chocolate in the top of a double boiler over simmering water, stirring constantly. Stir in peppermint oil.
***Or melt the chocolate the best way you know. I invested in a double boiler, but putting a smaller pot inside a slightly larger pot works too. Put a couple inches of simmering water in the big pot, and just make sure the little top pot isn't touching the water. Or you can always microwave the chocolate a few seconds at a time to get it all melted and smooth.
3. Pour chocolate onto prepared baking sheet spreading evenly using an off-set spatula. Chill until set, about 1 hour.
4. Melt white chocolate in the top of a double boiler over simmering water, stirring constantly.
5. Spread white chocolate mixture over chilled dark chocolate. You kind of have to spread fast as the white chocolate will begin to melt the dark chocolate underneath. You want it to melt a little, to seal the two layers together, but it's prettiest without dark chocolate marbled through I think. Sprinkle candy cane pieces over the white chocolate gently pressing into chocolate.
6. Chill until set, about four hours or overnight. Refrigerate until just before serving then break into pieces and serve or package as gifts. It will keep in the fridge for 5-6 weeks.

Saturday, November 7, 2009

The Troll Behind the Roll!

Photobucket
The recipe contest was published in the magazine. You can see the other recipes and better image quality here. My recipe is page 38, so you have to click a few pages over to get to it.
I am just kidding about the blog title, thanks to Natalie's long distance make-over, I don't look too trollish.

I'm being teased about it:

** My mom called me to tell me the magazine came in the mail. I asked how I looked, and I heard my dad say in the background--"Awful! She looks like she's trying to be a hot mom!" laughing. Mom: "He's just kidding honey. You look good."
If you need further clarification on what a "hot mom" is, I could make a whole post about this stereotype.
***Rhett saw the magazine and told me I "sold out".
Rhett: What's with the line over the A?
Me: So it reads [cray-poe] rather than [crap-o].
Rhett: How dare you change my name?
Me: Get over it.


Pumpkin Cinnamon Rolls
original recipe by Jessica CrApo
light pumpkin flavor makes these sweet rolls great for holiday gatherings--for dessert or great served at a brunch

INGREDIENTS:

DOUGH:
1/4 c. warm water
2 1/2 tsp yeast
1 tsp sugar
1/2 c. milk
2 eggs
1 c. canned pumpkin puree
1/3 c. margarine, melted
1/2 c. sugar
1/2 tsp nutmeg
1/4 tsp cloves
1 tsp salt
5-6 c. flour

FILLING:
2/3 c. canned pumpkin puree
1/2 c. butter, room temperature
1 c. packed brown sugar
2 T cinnamon
*optional: 3/4 c. raisins, 1/2 c. chopped walnuts or pecans

CREAM CHEESE FROSTING
4 oz cream cheese, room temperature
3 T butter1/2 tsp vanilla
2 - 2 1/2 c. powdered sugar

DIRECTIONS:
1. Combine warm water, yeast, and teaspoon of sugar in small bowl. Stir until yeast is dissolved. Let stand until froth doubles.
2. In mixer fitted with dough hook, combine milk, eggs, pumpkin, margarine, the 1/2 c. sugar, nutmeg, salt, and cloves. Mix until smooth.
3. Add 4 cups flour to mixing bowl. Pour frothed yeast mixture on top of flour. Knead about 5 minutes, adding flour 1/2 c. at a time until dough barely begins to clean the sides of the mixing bowl. Dough should be smooth and moist, but not sticky.
4. Spray a bowl with non-stick cooking spray. Place dough in greased bowl. Cover with wet towel, or plastic wrap sprayed with non-stick cooking spray. Allow to raise until doubled, about 1 hour.
5. While dough is raising, prepare filling. Place room temperature butter and pumpkin puree in small bowl. Using electric mixer, beat until mixture is smooth. In another small bowl combine brown sugar and cinnamon, set both bowls aside.
6. Pour dough out on slightly floured surface. Roll into a rectangle 16x21 inches, dough should be about 1/4 inch thick. Spread the pumpkin/butter mixture over rectangle. Next, evenly spread the sugar/cinnamon mixture on top, slightly pressing it into the dough.
7. Roll up long side of dough, forming long tube. Cut tube with sharp knife about every 2 inches, making 12 rolls. Place rolls in lightly greased 9x13 baking pan. Cover and let rise until nearly doubled, about 30 minutes.
8. Preheat oven to 400 degrees. 9. Bake rolls in oven until golden brown, about 15-20 minutes. While rolls are baking, beat together cream cheese, butter, powdered sugar, and vanilla extract to make frosting. Spread frosting on warm rolls before serving.
**Optional: Sprinkle a little nutmeg on top as garnish.
Happy Baking!

Thursday, August 13, 2009

Pizza On the Grill

Pizza made on your outdoor grill. I've seen these on blogs for a long time, but just recently tried it...and I loved it. Lynette loved it too. My dad wouldn't try it because it was too "weird". To my dad, "weird food" means gourmet and really tasty.
Photobucket


There are probably lots of instructions out there, but this is what I did--just winging it.
1. Make your pizza dough.
2. Get all your toppings ready and have them handy next to the grill. Heat your grill.
3. Roll out your pizza crust to desired thickness. Brush olive oil on one side and flip it onto the hot grill. The oil keeps the dough from sticking. Let the first side cook for 3-5 minutes until it is starting to crisp up.
4. While the first side is grilling, brush the raw side that is up with olive oil.
5. Flip the crust over. Now the second side is cooking and you are looking at a beautiful, grilled circle of crust. Quickly spread sauce over it and throw your toppings on.
6. Cover the lid of the grill to cook for about 5-10 more minutes unti the cheese is melted and the crush is firm and a little crunchy.
7. Eat it and love that it is summer!

Photobucket

For our pizza, I used prepared pesto as the sauce. We love pesto. Then I threw on mozzerella cheese, bacon crumbles, pine nuts, tomato sliced thin, and fresh basil. IT WAS GOOD. We really liked the crust. It's slightly crisp and has the great grilled flavor. Lynette suggested adding cooked chicken to this pizza next time. I agreed and I have a great lemon chicken marinade from this chick I met in Kirksville.
We had it with fresh corn on the cob. Actually, before we ate, I just ran out in my mom's garden and grabbed the fresh basil, corn and tomatoes. It's great to live with a garden addict.

Especially fresh corn on the cob. It is so delcious. Butter. Salt. Corn. Heaven must have stacks of fresh corn on the cob. Tonight Lynette and I were loving our "hand shucked" corn and observed how much better it is fresh. "FROM STALK TO STOMACH IN 30 MINUTES." I think when I grow up I will like to grow some corn of my own. RJ liked it. (Yes, his shirt is dirty and his nose had just quit bleeding...that is life)

Wednesday, July 29, 2009

Razzleberry Ice Cream

My mom has a massive garden. The highlight of her garden is the raspberry patch (at least to me). In one corner she has blackberry bushes. This is the first season they've done really well. So we have a big bucket of plump, fresh blackberries to use and enjoy.

I also have a lot of whipping cream from the half gallon I bought at Costco for the 80s party ice cream. So tonight I made razzleberry ice cream. It was really good. I tried to make this picture large like Ashley taught me so you can see how good it might taste.

Anyway, I just threw stuff in and it turned out great...I love when that happens.

I also love this ice cream maker my mother-in-law gave us when we were down there last weekend. It's the Gelato Jr. and we LOVE this little guy. It makes about a quart of ice cream. So kind of a small amount, but perfect for a small family. Also, it is all electrical so NO ice/ salt, no frozen ice cream buckets in your freezer. Spontaneously blend ice cream ingredients and dump it in, turn it on and in 30 minutes you have great dessert! We've been making a new batch about every other day. Sunday it was fresh apricot sorbet.

Anyway, here it is.
Photobucket

RAZZLEBERRY HOMEMADE ICE CREAM

4 - 6 strawberries, hulled
1/2 c. simple syrup**
1/2 tsp vanilla
1 c. fresh blackberries
1/4 c. raspberries
1/2 c. - 2/3 c. sugar to taste
1 c. whipping cream
small hand full of blackberries crushed to add


In blender combine all ingredients except crushed berries. Freeze according to manufacturer's instructions. Add crushed berries during last 10-15 minutes or so.
Simple Syrup: Bring equal parts water and sugar to boil to dissolve sugar. Cool. Store in air-tight container in refrigerator.
**This is for a one quart ice cream maker, multiply as needed for larger ice cream makers.

Monday, June 15, 2009

Bakery Chocolate Chip Cookies

The two 11 year old nieces have loved helping me cook since I've been watching them. We made these bakery chocolate chip cookies all the kids loved them because they are huge.

Chocolate Chip Cookies
Big, Fat, Chewy Bakery Cookies
from allrecipes.com


3/4 c. butter, softened
1 c. brown sugar
1/2 c. white sugar
1 egg
1 egg yolk
1 T vanilla
1/2 tsp baking soda
1/2 tsp salt
2 c. flour
2 c. chocolate chips

Preheat to 325 degrees.

Cream butter and sugars. Add egg/yolk and vanilla until light and creamy. Add dry ingredients until dough forms. Stir in chocolate chips.

Drop cookie dough in 1/4 c. globs on greased cookie sheets, at least 3 inches apart.

Bake 15-17 minutes, until edges are lightly toasted. Cook on sheets a few minutes before transferring to wire rack.

Makes 12 cookies.

Because these are huge, 1/4 c. of dough per cookie, you bake it longer at a lower temperature to cook them through. You could probably make 24 cookies and adjust cooking time and temperature. You could also use your favorite cookie dough to make these huge monsters.

Wednesday, May 20, 2009

Lemon Gelato

Italy and lemons have been on my mind lately.

Lemons because we bought a huge bag from Costco and need to use them. Italy, well mainly Rome because we recently saw Angels & Demons, which is set entirely in Rome. So we made lemon gelato.

I've only been to Italy once, but I loved the citrus all over. In one village on the coast especially, one of my favorite memories of the trip was a warm afternoon walking around smelling all the citrus trees. The lemon tree out the window was taken when we were in Venice. I loved that. I knew my mom would love it too.


Gelato is italian ice cream and it is amazing. In no way do I think you can replicate the actual stuff. On our trip, I ate gelato every single day, most days twice a day. The best gelato we had was in the Vatican in Rome. It was only 1.5 euro for a huge cone, we had strawberry. Maybe it was extra good because I had experienced an awful morning and ice cream helped cheer me up. Either way, here is this recipe which is good, but just an attempt at the real thing.


Lemon Gelato

a little taste of Italy cookbook


5 egg yolks
1/2 c. sugar
2 c. milk
2 T lemon zest
3/4 c. lemon juice
3 T thick (double) cream


Whisk the egg yolks and half the sugar together until pale and creamy. Place the milk, lemon zest and remaining sugar in a saucepan and bring to the boil Pour over the egg mixture and whisk to combine. Pour the custard back into the saucepan and cook over low heat, stirring continuously until the mixture is thick enough to coat the back of a wooden spoon--do not allow the custard to boil.


Strain the custard into a bowl, add the lemon juice and cream and then cool over ice. Churn in an ice-cream maker following the manufacturer's instructions. Keep in the freezer until ready to serve.

I usually double this recipe and it makes about 2 qts. We like to serve it with fruit.

Sunday, May 17, 2009

Blackberry Citrus Rolls

I LOVE SWEET ROLLS. Cinnamon rolls, orange rolls, etc.


I love these particular rolls in the summer. The combo of lemon & blackberries is delicious. I've also made these with blueberries instead of blackberries and that is good too.

Blackberry Citrus Rolls

DOUGH
1/4 c. warm water
2 1/2 tsp yeast
spoon of sugar
1 c. warm milk
2 eggs
1/3 c. margarine, melted
1 tsp salt
1/2 c. sugar
4 1/2 c. flour

FILLING
1/2 c. butter, softened
1 1/2. c. sugar
zest of 1 orange
zest of 1 lemon
1/2 to 1 c. blackberries, quartered length-wise

GLAZE
juice of 1 orange
1 T fresh lemon juice
2 1/2 to 3 c. powdered sugar

Let water, teaspoon of sugar and yeast froth until doubled. Add remaining ingredients and mix/ knead until soft dough forms. Additional flour may be required, add a little at a time until dough begins to clean side of mixing bowl. Place in greased bowl and cover with greased plastic wrap. Let rise until double, about 1 hour. Punch down and knead air bubbles out. Roll out into rectangle.

Spread 1/2 c. butter over dough evenly. Mix the sugar and orange/lemon zest in bowl. Spread sugar mixture over butter evenly. Sprinkle your quartered berries over dough. Roll up on long side into a long tube, wrapping the berries in tightly as you go.

Slice into 2" segments and place in greased 9x13 pan. Cover with plastic wrap again, let rise about 45 min or so until the rolls start poking out the top into volcano shapes.
Bake at 350 for 20-25 minutes.
Makes 12 rolls.
Mix juices with powdered sugar to form glaze. Drizzle over rolls after they've cooled 10-15 minutes.